Game Boy Pixel Art · Reference
The Style — Copy This
A complete, prescriptive top-down four-shade style spec with a matching CC0 art kit, if you would rather copy than decide.
Every decision below is already made, so you can start drawing without deliberating. It is a working style, not the only one — change things once you have made something.
The reasoning behind each rule is in the lessons; the readability rule in particular is Lesson 04.
1. The palette. Non-negotiable.
#9bbc0f   Paper   shade 0
#8bac0f   Light   shade 1
#306230   Dark    shade 2
#0f380f   Ink     shade 3
This is the bgb emulator’s Game Boy green — the green everyone pictures. It is also, by luck, the exact palette of every piece of the kit below, so anything you draw matches the borrowed art pixel for pixel.
Import into Aseprite via Palette ▸ Load Palette:
gb-bgb.gpl
Set your Aseprite document to Indexed colour mode with this palette loaded. You then physically cannot use a fifth colour, which removes an entire class of mistake under deadline.
2. The kit. Download these three things now.
All CC0. All top-down. All already in this exact palette. You can ship them as-is, extend them, or trace over them.
| What | By | Get it |
|---|---|---|
| Dungeon tiles, 8×8 | stealthix | OpenGameArt |
| Interior tiles, 8×8 | stealthix | OpenGameArt |
| Knight, 16×24, 4 directions, walk / run / idle / push / attack / hurt | Chasersgaming | OpenGameArt |
Local copies are vendored in this workspace under assets/examples/ — see
CREDITS.md. None of the three requires
attribution. Credit them anyway; it costs one line in a readme.
 Knight16×24
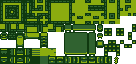 Interior tiles8×8
3. Sizes. Pick these and stop thinking about it.
| Thing | Size |
|---|---|
| Tile | 8×8 (the kit’s grid) — compose rooms in 16×16 blocks of four |
| Character | 16×24 — taller than a tile, so heads read above the floor |
| Screen | 160×144 — the real Game Boy screen; 20×18 tiles |
| Camera | Snap to whole pixels. Never rotate, never scale by a fraction. |
In Unity: import textures as Point (no filter), Compression: None, Pixels Per Unit 8, and set the camera to an orthographic size that lands on whole pixels.
4. The rule the whole style hangs on
The floor is never the darkest thing on screen. Walkable ground stays at key 1.0–1.2. All the darkness goes into walls, voids and structure.
Measured, on the actual kit — silhouette contrast between the knight’s outline and the ground behind it, on the 0–3 shade scale:
| The knight stands on… | Ground key | Contrast | Verdict |
|---|---|---|---|
| Flat floor tile | 1.00 | 1.99 | reads clearly |
| Wall tile | 2.57 | 0.44 | vanishes |
| Void tile | 3.00 | 0.01 | invisible |
The knight is outlined 99% in Ink. Put it on a dark floor and you have drawn a black shape on a black shape.
Scenes still get weight from the walls being near-black and there being a lot of them — a light ribbon you walk on, cut out of a dark mass. That is a level-design lever you can pull later, not a palette decision you are stuck with now.
5. Shade budgets per asset type
Aim for these. They are measured off the kit, not invented.
| Asset | Key | Paper | Light | Dark | Ink |
|---|---|---|---|---|---|
| Floor tile | 1.0–1.2 | 0–10% | 60–90% | 5–25% | 0–10% |
| Wall / structure tile | 2.4–3.0 | 0–2% | 5–20% | 10–30% | 55–90% |
| Prop, on the floor | 2.0–2.4 | 0–5% | 15–30% | 25–40% | 30–50% |
| Character | 2.2–2.4 | ~5% | ~7% | ~36% | ~51% |
“Key” here just means the average shade index of the asset, Paper 0 to Ink 3.
The knight measures key 2.33 — Paper 5.3%, Light 7.4%, Dark 36.2%, Ink 51.1%. Match that and your new characters will sit beside it invisibly.
6. Drawing rules, in order of importance
- Close the silhouette in Ink. Every pixel of a character or prop that touches the floor colour is Ink. 99% of the knight’s is. No exceptions, no gaps.
- Floor first, and keep it boring. Flat Light with sparse Dark flecks. A busy floor destroys everything standing on it. If in doubt, remove detail.
- Ink is a material, not a pen. In the walls, Ink is the big filled mass — not a 1px line around things.
- Paper is a spark. Under 5%. Torches, eyes, metal edges, water. Never a fill.
- Two mids do the describing. Light for lit tops, Dark for the turned-away side. Fix your light direction as top-left and never move it.
- No dithering on the floor. Under a moving sprite it shimmers and reads as noise. Dither on large static walls only, if at all.
- Squint. If the character’s shape survives blurring, ship it.
7. A 40-minute warm-up
- Download the three kit packs above.
- Load
gb-bgb.gplinto Aseprite, make a new Indexed document, save it astemplate.aseprite. - Open stealthix’s interior sheet next to it. Find the flat light floor tile.
- Draw one 8×8 floor tile of your own in that style. Match the key: mostly Light, a few Dark flecks.
- Draw one 8×8 wall tile. Mostly Ink.
- Drop the knight on both. If it disappears on the wall tile, you got it right — that is the wall doing its job.
- Stop. You have a style.
8. While you work
- Borrow first, draw second. The kit is CC0. Use stealthix’s tiles for everything and only draw the handful of things your game specifically needs.
- One new tile at a time, and check it against the budget table before moving on.
- Do not add a fifth colour. Not for one thing. Not for the UI.
- Do not change the palette part-way through. If you hate the green, swap all four hex values at the very end — the art is value-based, so it survives a retint intact.
- If something reads badly and you have five minutes, the answer is almost always raise the contrast between the thing and what is behind it, not add detail.
Related
- Lesson 04 — Making your character read anywhere — why rule 4 is true.
- The Four-Shade Contract — the fuller reference.
- Glossary.